
There are a lot of ways to squat with a barbell. A lot. Like, a really big amount. Barbells are versatile equipment, and squats are a versatile exercise. So I'm only going to cover a few different kinds of squat.
For the sake of brevity (and making it easier to learn if you're building on my previous post), we'll continue with the same stance. This alone culls a lot of different squat variations which use a wider stance, narrower stance, staggered stance and even one leg off the floor entirely.
So, the same technique points covered in body weight squats apply with barbell squats:
- Set heels shoulder-width apart and turn toes out slightly.- Lift chest and contract abs.- Look straight ahead.- Spread the floor with your feet and push your knees out throughout the movement.- Keep your tailbone lifted.- Sit down onto the air between your legs and then come back up by driving your heels down and chest up.
Front Squats
There are two main ways to do the front squat: the Olympic style and the crossover style.
In the Olympic style, you will set your hands just outside of shoulder width on the bar. You'll want to set the bar so that it's held up by the deltoids, with the fingers lightly supporting. Some people can get all four fingers on the bar, but most will only be good for two or three fingers, depending on flexibility and individual anthropometry. Your elbows should be pointing straight ahead, with your arms roughly parallel to the ground and parallel to each other. You don't want to choke on the bar, but you do still want your elbows to be up high.
A common mistake in this style of front squat is to try and grip the bar in your palms. Remember, you only want your fingers touching the bar, and they're only there for a bit of support.

The crossover style is convenient for those who lack the forearm flexibility to use the Olympic style front squat. In this method, you'll still point your elbows up and forward, but instead of having your fingers outside the shoulders, you'll cross your left hand over onto your right shoulder, and your right hand over onto your left shoulder.

In both variations, begin with the barbell in the squat rack. The rack should be set so that the bar is at about mid-chest height. People often set the bar too high in the rack, which results in having to calf raise their way in and out of the rack. Not a big deal with light weights, but when the weights get heavy, this can result in some brilliantly failtastic experiences.
Step up to the rack and set your feet so that you can stand straight up with the bar (due to the weight of the bar, if your feet aren't set up right you'll either move forwards or move backwards when you unrack the bar). Set the bar evenly across the front of the shoulders, lift your chest, take a deep breath, brace your whole body and stand up straight. Take a couple steps back (don't go for a walk with the bar if you don't have to), make sure your feet are properly set (shoulder width apart, toes slightly out, one foot isn't further forward than the other), and squat.
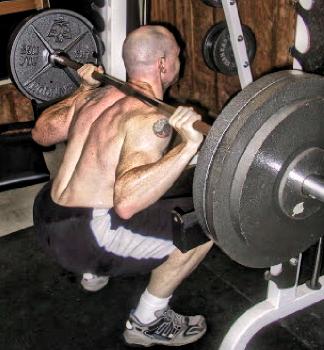
Having a weight loaded onto the front of the body has some interesting effects. It changes the centre of gravity so that to prevent yourself from falling forwards (or dumping the bar forwards), you'll have to remain a little more upright than in body weight squats. The consequence of your torso remaining upright is that your hips won't drift far back, which means your knees will have to go further forwards if you're to hit full depth, which means your calves will be in for more of a stretch than other squats would provide. Some calf stretches (as well as some calf raises to strengthen the new-found ROM) may be in order here, although another option is to have your heels elevated. In the coloured picture above, the Olympic lifter is wearing Olympic weightlifting shoes, which set the heels about an inch higher than the toes. In the black and white photo, the lifter has his heels elevated on a thin block. By decreasing the distance that the hips drift and increasing the distance that the knees drift, emphasis is taken out of the hips and into the quadriceps.
Technique points (beyond those of body weight squats):
- Hands evenly placed.
- Elbows up.
- Bar resting on anterior deltoids.
- If using Olympic style, fingers just touching the bar rather than gripping it.
- Don't choke.
Back Squats
Just as there's more than one way to do a front squat, there's more than one way to do a back squat. Here are some of the variables you can play with:
1. Bar placement
2. Hand placement
3. Type of grip
Bar placement
So, there are two bar placements that I'm qualified to speak about. The first is the high bar or Olympic bar placement. This is up on the upper trapezius, just below the big bone at the base of your neck. This bar placement is conducive to a relatively upright torso position (although not as upright as the front squat), which is why Olympic lifters tend to use it -- it has good carry-over to their front squats and competition lifts. I've found it good to squeeze my shoulder blades back and very slightly up to get a good shelf with my upper trapezius for this variation. This position is generally easy on the shoulder joint, but can make the upper trapezius very sore, especially if it's your first time.
High bar squat
The second bar placement I can talk about is typically referred to as a low bar position, however, in light of the placement I can't talk about beyond a theoretical analysis (and experience beyond theory is important for this type of discussion, thus why I consider myself unqualified to discuss that kind of low bar squat), this is perhaps more accurately described as a mid bar squat. This position sits the bar across the top of the posterior deltoids. It's not as friendly on the shoulder joint as the high bar squat, but it does provide greater stability (assuming you've got decent posterior deltoids to tighten up and make a solid shelf). Having the bar lower on the back tilts the torso further forward in order to maintain proper balance, which increases ROM at the hips and results in more glute and hamstring work. Many people approach high and low bar squatting with completely different techniques, which is fine. Some think this is required (I used to be one of them), which isn't correct.

The version of low bar squatting that I'm not qualified to talk about sits the bar (if my understanding is correct, which it probably isn't) in the groove between the deltoids and the triceps. Again, this causes a further forward tilt, more hip flexion, and greater glute and hamstring work. I've observed lifters having more difficulty fully extending their hips at the top of the squat using this technique. I couldn't tell you how it feels or what it's like trying to become proficient in this method. From what I've observed, this technique is mostly only used by powerlifters, and (if I recall correctly) some powerlifting federations don't allow it in competition.
Whatever the bar placement, at heavy weights the lifter will always want to keep the bar over the middle of the foot, or else s/he can expect to fail. And get laughed at.
Hah!
Hand placement
Hand placement is related to bar placement, in that the higher the bar, generally the closer the hands can comfortably be, thanks to these things in our forearms called bones (same reason why the further back the hips go, the less the knees will come forwards, and the more the knees come forwards, the less the hips will travel back).
As a general rule, you should aim to have your hands as close together as you can comfortably get them. The closer they are, the closer you can keep your elbows to your back. The closer your elbows are to your back, the tighter you can squeeze your trapezius and deltoids, making a tighter shelf for the bar to sit in, making the bar more stable. In saying that, what's appropriately close for me may be too close for you, or may be too far out and cause a loose shelf.
There are various competitive lifters who have their hands out as far as they can go on the bar. I'm not sure if it's because this is still as close as they can bring their hands, or if they have a different reason for having their hands out that far. If you're curious, you could always try asking them.
Wherever you put your hands, set them evenly on the bar, unless you have unusual bodily issues that require you to do otherwise.
Grip type
You've basically got two options here: thumbs around or thumbs over. Thumbs around makes use of your opposable digits, thumbs over treats your thumbs like fingers. I use thumbs over, many people use thumbs around. I used to think that this was a really important thing, but I'm progressively becoming less convinced that this is the case. What I think really matters is that you aim to keep your wrists straight, pull the bar into your back, and grip the bar tightly.
Technique points (beyond those of body weight squats):
- Hands evenly placed.
- Make a solid shelf by squeezing your shoulders together.
- Pull elbows into sides.
- Pull bar into back.
- Squeeze bar tightly.
Notes on breathing
With body weight squats, it's not particularly important that you breathe any particular way, so long as you do in fact breathe. With barbell squats, breathing becomes more important. There are two methods you could use, depending on health status and goals.
The first method is to breathe in the eccentric (while you're squatting down) and out on the concentric (while you're standing up). This is fine when the weights aren't too intense. But, when you're using heavy weights, this method won't suffice.
For heavy lifting, provided it's medically okay to do so (some conditions, such as hypertension, make this risky), take a deep breath in at the top and hold it throughout the set. The act of holding a deep breath will increase intra-abdominal pressure, which in turn will help you to brace harder through the core and get your through sticking points. Exhale at the top, and take another deep breath at the start of each rep.
If you use a lifting belt, you'll want to hold your breathe during each rep. The belt works by having the abs pushed out against it, which happens while you hold a deep breath. Exhaling will generally result in the pressure against the belt decreasing, reducing the belt's support.
No comments:
Post a Comment
For reasons that are beyond me, I like to hear what people think, so please leave a comment and let's work together to trick random passers-by into thinking this blog is actually popular.